In this post we’re going to see how we can protect some views or components. The use case is very simple: building a login component and if the credentials (user and password) are right, go to a protected view.
You can find the code in github. To launch the project you have to execute this command:
ng serve
(you need to have installed angular-cli.
Angular will build and package the application but it’ll not open our browser…so you have to open the browser and write the following URL: http://localhost:4200
Well, let’s start. The first we need for our use case is a login service. We’re going to build an easy one (login.service.ts):
import {Injectable} from "@angular/core";

@Injectable()
export class LoginService {

  login(user:string, password: string):boolean {
    if ((user && user == 'admin') && (password && password == '1234')) {
      sessionStorage.setItem('userlogged', 'ok');
      return true;
    }
    return false;
  }

  closeSession():void {
    sessionStorage.removeItem('userlogged');
  }

  isUserLogged():boolean {
    let userlogged:string = sessionStorage.getItem('userlogged');
    return userlogged != null && userlogged == 'ok';
  }

}
In this service, we’ve declared three methods:
- login(user, password): this method is used to perform a login in the system. If the user and password are OK, it sets a auth key in the session storage.
- closeSession(): removes the auth key stored in the session storage.
- isUserLogged(): get the auth key and checks if its value is ‘true’
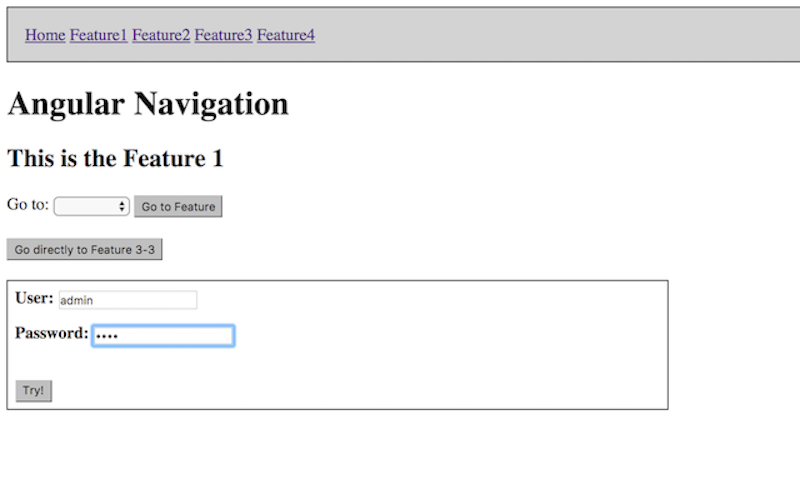
The second thing we need is a login form (sorry about the CSS but it’s not the target of this post). We are going to build a light one adding it to the feature1.component.html:
...

<div style="font-weight: bold; border: solid 1px black; width: 40%">
  <div style="padding: 0.4rem">
    <label>User:</label>
    <input type="text" #user>
  </div>
  <div style="padding: 0.4rem">
    <label>Password:</label>
    <input type="password" #password>
  </div>
  <br>
  <div style="padding: 0.4rem">
    <input type="button" value="Try!" (click)="goToSecretFeature(user.value, password.value)" />
  </div>
</div>
...
And we use the login service to check credentials in feature1.component.ts:
...
constructor(private _router: Router, private loginService:LoginService){}
...
goToSecretFeature(user, password) {
    if (this.loginService.login(user,password)) {
      this._router.navigate(['/feature4']);
    } else {
      window.alert('Try again!');
    }
}
...
Guards
Angular defines some router hooks to do some action during the navigation. In this case we’re going to show how to deny the access to some components in base on a certain logic. We define a new path associated to a new component (feature4.component.ts) and we want to protect this path.
Let’s modify app.routing.ts to do this:
const routes: Routes = [
  { path: '', component: HomeComponent, data: {appName: 'Angular Routing', appVersion: '1.0.0'}},
  { path: 'feature1', component: Feature1Component},
  { path: 'feature2', component: Feature2Component},
  { path: 'feature2/:param1', component: Feature2Component},
  { path: 'feature3', component: Feature3Component,
    children: [
      { path: 'feature31', component: Feature31Component},
      { path: 'feature32', component: Feature32Component},
      { path: 'feature33/:origin', component: Feature33Component}
    ]
  },
  { path: 'feature4', component: Feature4Component, canActivate: [HasPrivateAccessGuard], canDeactivate: [ConfirmExitPrivateZoneGuard]},
  { path: '**', component: PageNotFoundComponent}
];
If you check the path ‘feature4’ you’ll see that we’ve added two properties: canActivate and canDeactivate.
Both of them are known as “Guards”. In Angular, Guards are, in a high level, interfaces that define methods that every application has to implement as it wants but these methods have to return either Observable
When a navigation action is going to be performed, Route checks if there is a Guard associated to the target path and it is so, it executes the method that implements the guard.
Let’s talk about canActivate and canDeactivate.
CanActivate
CanActivate is an interface. Its definition says:
Indicates that a class can implement to be a guard deciding if a route can be activated.
This guard is “executed” before enter to a target path in order to check if is possible to activate the route or not.
So, as interface, you have to create a class that implements this interface. This interface declares the canActivate method and you have to implement the logic that you need in your application in order to grant access to the component.
In our example this logic is so easy. Basically, calls to the login service to check whether the user is logged or not (has-private-access.guard.ts):
import {Injectable} from "@angular/core";
import {CanActivate} from "@angular/router";
import {LoginService} from "../services/login.service";

@Injectable()
export class HasPrivateAccessGuard implements CanActivate {

  constructor(private loginService:LoginService) {}

  canActivate() {
    return this.loginService.isUserLogged();
  }
}
We’ve created a class HasPrivateAccessGuard that implements CanActivate interface so, by this way, it has to implement a canActivate method. The implementation in our case is so simple: if the loginService.isUserLogged() returns false, the navigation action to ‘/feature4’ is not done.
If we try to access directly to /feature4, nothing happens. If we add a console.log() sentence in HasPrivateAccessGuard we can asses that the guard is executed. The logic inside the guard could be so complex as you want:
@Injectable()
export class HasPrivateAccessGuard implements CanActivate {
    ...
    canActivate() {
     console.log('This is the HasPrivateAccessGuard...');
     return this.loginService.isUserLogged();
    }
}
In the console we can check that the message is written:

Now we are trying to get to “/feature4” using the login form. We have to enter the user (in our case is ‘admin’) and password (in our case is ‘1234’) and click on the button:
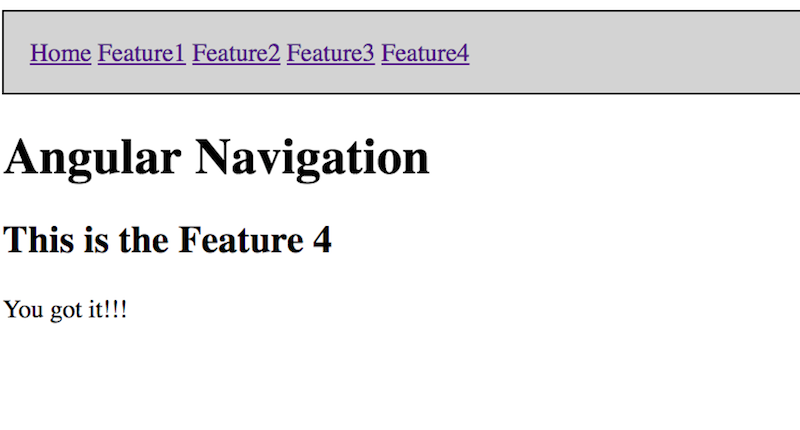
The Router calls to the guard (HasPrivateAccessGuard), the login service says that everything is ok and finally the navigation action is done, showing the view associated to “/feature4”:
CanDeactivate
This is other interface and its definition says:
Indicates that a class can implement to be a guard deciding if a route can be deactivated.
So, this guard is “executed” over the current path when a navigation action to a other path is required.
Using this interface is a little bit trickier than CanActivate because is declaring a generic type in its definition:
export interface CanDeactivate<T> {
  canDeactivate(component: T, route: ActivatedRouteSnapshot, state: RouterStateSnapshot):
      Observable<boolean>|Promise<boolean>|boolean;
}
So you need to implement the method canDeactivate but you need to define a type/interface to associate as type of CanDeactivate:
import {Injectable} from "@angular/core";
import {CanDeactivate} from "@angular/router";
import {Observable} from "rxjs";
import {LoginService} from "../services/login.service";

export interface CanComponentDeactivate {
  canDeactivate: () => Observable<boolean> | Promise<boolean> | boolean;
}

@Injectable()
export class ConfirmExitPrivateZoneGuard implements CanDeactivate<CanComponentDeactivate> {

  constructor(private loginService:LoginService) {}

  canDeactivate(component: CanComponentDeactivate) {
    if (component.canDeactivate && component.canDeactivate()) {
      this.loginService.closeSession();
      return true;
    }

    return false;
  }

}
This means that the component associated to the path must implement CanComponentDeactivate because the Router is going to call to the canDeactivate method of the guard with a param of type CanComponentDeactivate.
In other words, if we associated a CanDeactivate guard to a path, the component linked to this path has to implement a method (or methods) defined in the Type associated to the CanDeactivate guard and the component is responsible to implement the logic to determine if the navigation can be done or not.
In our example, we add the following logic to Feature4Component:
import {Component} from '@angular/core';
import {CanComponentDeactivate} from "../guards/confirm-exit-private-zone.guard";
@Component({
  selector: 'feature4',
  templateUrl: './feature4.component.html'
})
export class Feature4Component implements CanComponentDeactivate {

  canDeactivate() {
    return window.confirm('Do you really want to exit?');
  }
}
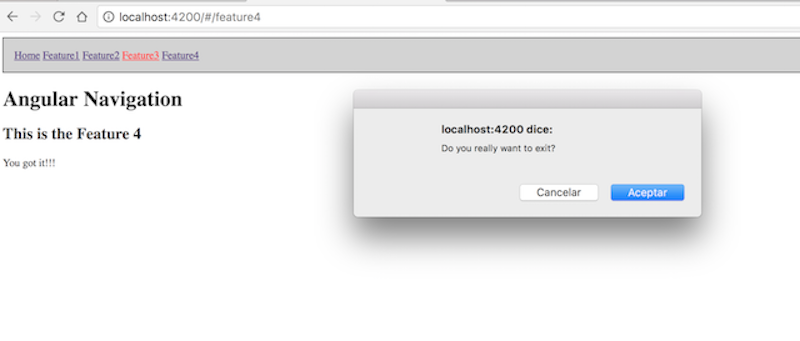
If the user is in “/feature4” and decide to navigate to other path, the _ConfirmExitPrivateZoneGuard is executed and finally the method canDeactivate of Feature4Component is called, showing the confirm dialog to the user:
CanActivateChild
if you read the Router’s documentation you’ll see the CanActivateChildGuard. Its definition says:
Indicates that a class can implement to be a guard deciding if a child route can be activated.
I must say that it could be a little confused because you can assign a CanActivate guard to a parent component and this guard would be applied before activating the child routes. But, for instance, we can have the requirement of activating groups of paths depending on the user’s roles. We’re modifying app.routing.ts to add child paths to /feature4:
...
{ path: 'feature4', component: Feature4Component, canActivate: [HasPrivateAccessGuard], canDeactivate: [ConfirmExitPrivateZoneGuard],
    children: [
      {path: 'rol1', canActivateChild: [HasPrivateAccessGuard],
        children: [
          {path: 'feature41', component: Feature41Component},
          {path: 'feature42', component: Feature42Component}
        ]
      },
      {path: 'rol2'
        ,
        children: [
          {path: 'feature43', component: Feature43Component}
        ]
      }
    ]
 }
...
We’ve defined two different groups based on roles:
- feature41 and feature42 need the user to have ‘rol1’
- feature43 needs the user to have ‘rol2’
We need to modify login.service.ts to add logic in order to support this model. The login.service.ts will have the following code:
import {Injectable} from "@angular/core";

export interface User {
  name:String,
  password:String,
  roles:String[]
}

@Injectable()
export class LoginService {

  readonly users:User[] = [
    {name: 'admin', password: '1234', roles: ['rol1', 'rol2']},
    {name: 'noadmin', password: '1234', roles: ['rol2']}
  ];

  private userLogged:String;

  login(user:string, password: string):boolean {
    let usersFound:User[] = this.users.filter(_user => {
      return user === _user.name && password === _user.password;
    });

    if (usersFound.length === 1) {
      sessionStorage.setItem('userlogged', user);
      this.userLogged = user;
      return true;
    }
    return false;
  }

  closeSession():void {
    sessionStorage.removeItem('userlogged');
  }

  isUserLogged():boolean {
    let userStored:string = sessionStorage.getItem('userlogged');
    return this.userLogged === userStored;
  }

  userisAllowed(url:string) {
    let rolAllowedArr:string[] = /(rol[0-9]{1})/g.exec(url);
    if (rolAllowedArr.length > 0) {
      let usersFound:User[] = this.users.filter(_user => {
        return  _user.name === this.userLogged && _user.roles.indexOf(rolAllowedArr[0]) >= 0;
      });

      return usersFound.length === 1;
    }

    return true;
  }

}
We’ve added an User type and an array of two users. One with roles ‘rol1’ and ‘rol2’ and one with just ‘rol2’. We’ve also added a userisAllowed method that receives an URL and evaluates whether the user can access to this URL or not.
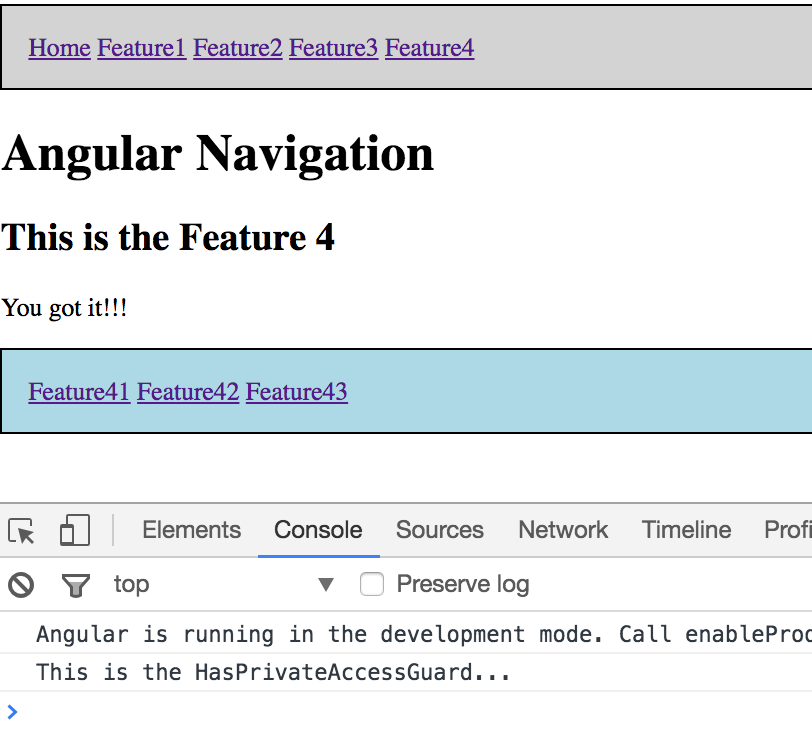
We also add a navigation bar in Feature4Component modifying the template associated (feature4.component.html):
<h2>This is the Feature 4</h2>
<p>You got it!!!</p>

<nav style="border: 2px solid black; padding: 1rem; background-color: lightblue">
  <a [routerLink]="['./rol1/feature41']">Feature41</a>
  <a [routerLink]="['./rol1/feature42']">Feature42</a>
  <a [routerLink]="['./rol2/feature43']">Feature43</a>
</nav>

<router-outlet></router-outlet>
And, finally we have to modify the HasPrivateAccessGuard to implement the CanActivateChild interface:
import {Injectable} from "@angular/core";
import {CanActivate, CanActivateChild, RouterStateSnapshot, ActivatedRouteSnapshot} from "@angular/router";
import {LoginService} from "../services/login.service";

@Injectable()
export class HasPrivateAccessGuard implements CanActivate, CanActivateChild {
  constructor(private loginService:LoginService) {}

  canActivate() {
    console.log('This is the HasPrivateAccessGuard...');
    return this.loginService.isUserLogged();
  }

  canActivateChild(route: ActivatedRouteSnapshot, state: RouterStateSnapshot) {
    console.log('This is the HasPrivateAccessGuard-child...');
    return this.loginService.userisAllowed(state.url);
  }
}
So, if the user does login in the application and the application navigates to /feature4, the canActivate method is executed, evaluating if the user can get the target path.
Once the user is in /feature4, if the user clicks some link in the navigation bar (feature41, feature42 or feature43), the canActivateChild is evaluated.
If we are not logged and try to access directly to the feature41 path writing the url http://localhost:4200/#/feature4/rol1/feature41, we can see that just the canActivate is evaluated. As this guard return false, no more guards are evaluated.
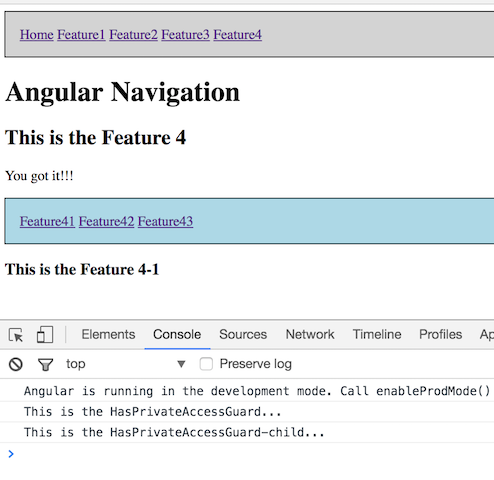
But if we do login as ‘noadmin’ and we try to access to the feature41, we’ll see that just the canActivateChild is evaluated because we are already in the parent path (/feature4):
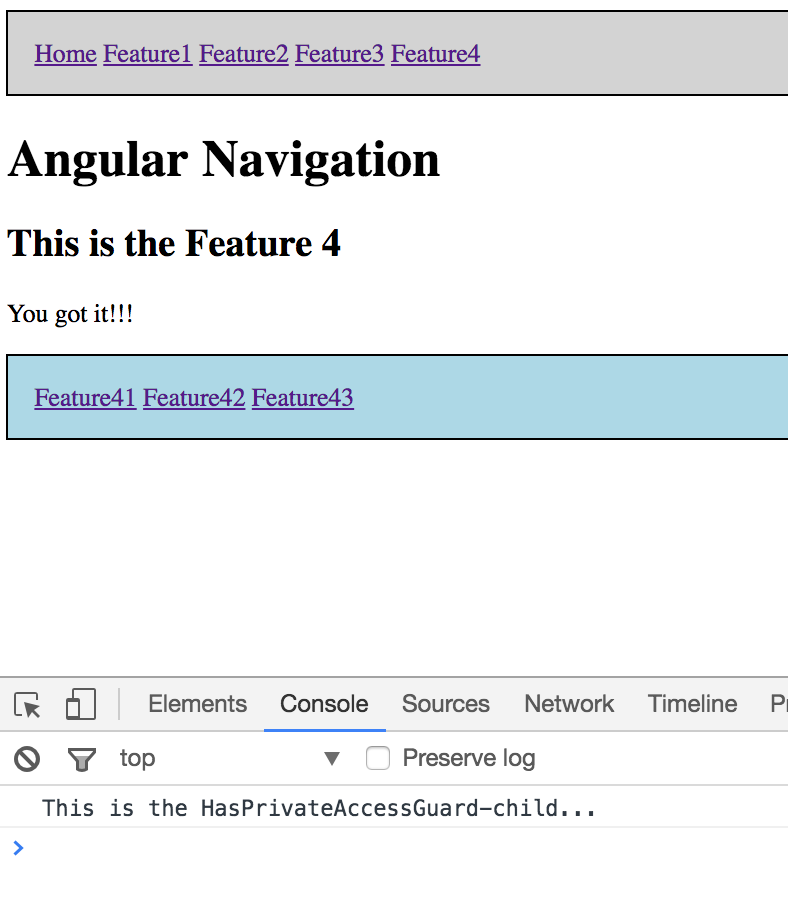
Nothing happens because the canActivateChild method returns false so for that reason we’re still in /feature4
That’s all. I hope this post is useful for you!